Sunday, December 1, 2013

Let's Talk Cabinetry, Shall we?

True to form it's been months since my last post.  In my defense we have been moving, unpacking, and 'setting up shop' in the new home.  It's been interesting living in the house during the final phases of the remodel.  I've never dusted so many times in one week! But I digress...

The reason for this post is the talk about our kitchen cabinetry - get excited! With Ryan's help, we decided to use a company in Atlanta for our cabinets.  (Things can be a little tricky when you are working with suppliers from out of town. Just a word to the wise.)  The most difficult part about designing a kitchen is thinking about where you would store pots and pans, everyday plates, silverware, platters, etc.  It's almost impossible to know where you want to put everything when you are designing the kitchen.  I wish I could have lived in the space before to know what I needed.  Luckily, Ryan sat down with me and he had great insight about what I would probably want and what I could leave out.  Now that we have been in our house and using the kitchen fully, there are just a few things I would change.

I will repost a few 'before' pictures from the old kitchen below.


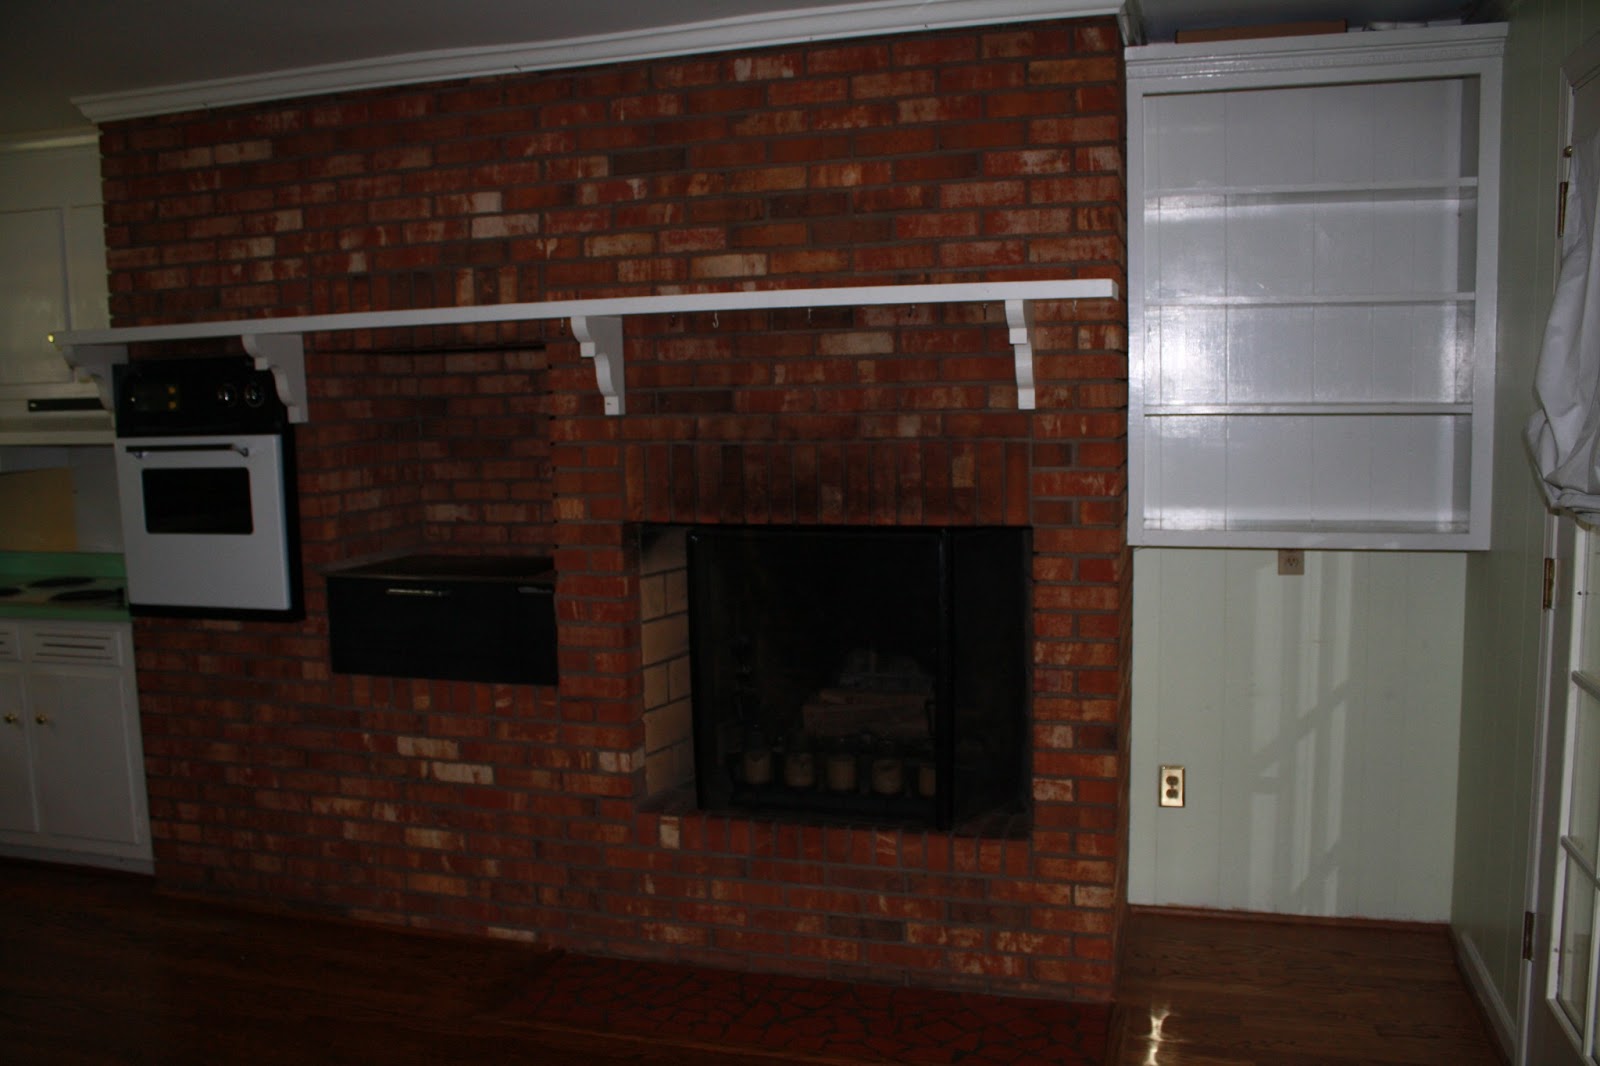
If you'll remember with me, we took out the full brick wall with the oven, indoor grill, and fireplace.  This is a design moment that my mom will NEVER let me live down.  She is the reason the wall finally came out.  BOY what a different it made!! With the bricks out, we doubled the size of our kitchen. It really gave it the 'wow' factor. 

Now it was time to fill the space...

I wanted a simple cabinet that would be timeless.  We chose a dark colored wood, but that didn't bother me because I planned to paint them.  I know what you are thinking...Why buy them dark if you are painting them? It would still come out cheaper to order them from this company and then have them painted rather than have them made in the color I wanted.   

Plain and simple.


I don't want to do a full reveal of the kitchen cabinets all installed yet...you'll just have to wait.

I will say, the most difficult part of designing the kitchen was choosing the cabinet pulls and knobs.  There are so many to choose from out there and at a variety of prices I might add.  I once picked a set out that were $30 per drawer knob...per knob, people! That's just not doable at this point in my life. As my search continued, I finally found myself at Target, of all places, wandering over to check out their selection. There they were.  I purchased all that Woodruff Road had in-stock and then asked my in-laws purchase all that Wade Hampton had in-stock.  We have quite a few cabinets for these to adorn. I will say the pulls are a little deeper than I thought, but they are working out just fine! 


We used the same style cabinetry in our remodeled master bathroom.  When I find something I like, I go with it! That's probably why I have four of the same shirt in different colors in my closet. I get that from my mother, too.

I'll also include the picture of our granite.  Wow, was that a fiasco.  Granite is one of those things that I get nervous to pick out because it's not easily changed.  Paint - easily changed. Knobs and pulls - easily changed. Granite - not so much. I think before it was all said and done, we chose three different slabs before finally deciding on this one.  I sent Ryan to check it out in person and approve it before we had it installed. The slab has more of a cream tone with accents of black and burgundy.  Almost like splashes of red wine throughout.  It's hard to get an exact picture, so this was the best I could do.
I love it more that I thought I would.

Did I mention we had an island put in? Well, we did. I've always wanted a huge island where everyone could eat, drink, and laugh for hours.  We chose to put a butcher block top on the island to make it more of an accent to the kitchen.  Ryan ordered two slabs of butcher block to get the correct width and length for our island.  
This will serve as my teaser photo for the island. 

**Leave comments about what you would like to see posted next. Maybe that will help me cut down on time in between posts!**


Monday, September 23, 2013

The walls are up and we're in the home stretch!

Alright, alright, I know it's been way to long.  I've heard it from many of you, but honest to goodness I had a computer issue that wasn't allowing me to attach pictures.  And, let's be honest - that's what you're here for!

As work continues on the main areas of the house, we have started to get our hands dirty as well.  First on the list was ridding the yard of overgrown 'weed trees'.  I call them weed trees for obvious reasons - the weeds had grown so big that to an untrained eye - it might seem as if it was planted in our yard.  When we were done at the end of the day, the pile of weeds was as tall as me! (I'm no shorty!) Luckily for us, Greenville County comes around with equipment to pick up all grass and landscape trimmings. I will LOVE having that service.

Now for more construction and house updates:
As I said, we have painted a couple rooms and finally found our paint color for the entire house.  The first room I painted was the bigger spare bedroom. Let me tell you...it was a PAIN. There is a narrow hall type entrance to the room, plus a closet door, plus a window, PLUS a bank of windows! It took most of the day simply trimming in the room before rolling the walls.  The yellow pictures are the original color from when we purchased the house.
Excuse our belongings, but you see all the windows! Great light....not fun to paint. 

Entrance to the spare bedroom

The color I picked from Sherwin Williams was too light so I took a sample color I had and mixed it with the gallon until I had darkened it a tad. Therefore, don't ask the color - it's custom. :)  I wanted to go light in color and neutral because we have dark wood furniture for this room. This is where we will be 'setting up camp' until our master floors and bathroom are finished.


Let me just take a moment to say this picture looks like I painted the ceiling, but it's just the darkness of night combined with my flash.  I told you it took me ALL DAY! :)


I'm also fully convinced that there are at least 40 nail holes...on each wall... in each room.  Covering and sanding these before painting is a prep job for the night before. Otherwise, the painting won't get finished in a day! See evidence below...
Front room (soon to be man room/office)

This room is really versatile. It could serve as a formal dining room, formal living room, playroom, or office/tv room.  We'll be using it for the later of the options.  Partly because we don't have furniture to set up the other options!! This room was a mustard yellowish something or other. Nothing to really catch your eye.  Now lets look at the after color and the difference in the room.  I chose Pediment by Sherwin Williams. Light and airy for the house.


We also used the same color in our bedroom...


This is a sneak peak into our new master bathroom.  (I know you can't see much of anything.  That big reveal will be later. )

Outside big things are happening as well.  I have some GREAT in-laws that aren't afraid to work either.  Mr. and Mrs. Mathis set to work on pressure washing the deck.  As you can see on the bottom of the 'white' rails - it needed it! I'm pretty sure this deck had never been washed and it housed a dog - daily.  There were marks from his body rubbing against the white siding as well as the rails.


Before pressure washing


After!
Clean and ready for a party! 

We will be moving in Sunday.  Thank you for all the support. We hope the next time you see this deck, you'll be standing on it and enjoying a cold beverage of your choice!  The construction is still in progress so we will be using just 3 rooms in our new home.  (And maybe trying to crash at YOUR house.)

I promise my next post will be sooner rather than later.  Spare bathroom updates are next!


Sunday, July 28, 2013

Teasers

As the progress continues on the home front, we are required to make several design decisions.  This stage makes me nervous because it's not as easy as picking a paint color that can be changed within a day if we don't care for it. No, these are major decisions that we will probably never go back and change. We are choosing tile, cabinets, kitchen layout, and placement of fixtures.  Don't get me wrong! This part of the process is just as exciting as it is nerve wracking.

In order to ensure that I make the 'correct decision', I keep in mind the classic and timeless design look of homes.  Classic homes will never be trendy or look out of date.  We aren't going for funky, people! Even with white and black subway tile in my current condo - the bathroom looks like it could have been designed last week. (When in reality, it's been decades!) I'll start by saying that white subway tile will, again, make an appearance in our new home.  The pictures below are a zoomed in version of other accent, floor, and wall tiles we will be using in the master bathroom.


Spare bathroom...there are SEVERAL issues in here. However, we aren't having this bathroom professionally remodeled. It's a DIY project that will take about a weekend - hopefully. Yesterday I took to painting the linen closet located inside the bathroom.  I'm weird about closets.  When I move, I want them painted so that I can place my things in fresh shelves.  Like I said, I'm weird!

The closet was a silver-blueish color. Blah!
Crisp Clean White!

I've also started my search for the perfect wall color for the majority of the home. I have searched the internet and design blogs in my hunt for the color that will morph in each room and compliment the various styles and colors of furniture. Apparently it makes your house look larger if you stick to different hues of the same color or just use the same color. I used to be one of those people that painted every room a different bright color (and there is nothing wrong with that!), but in my 'older age' I prefer neutrals with colored accents.  This may or may not have been an influence of the various decorator blogs I have read. :)

All the rooms were different colors when we purchased the house.  I'm wondering if it is worth my time and energy to prime each and every room so that I start with a clean slate. OR do I just want to paint over the existing colors and see what variations of the color may pop out and slightly change in each room?  I enjoy painting, but I honestly DO NOT want to spend weeks of my life painting and repainting rooms. Trim work is a whole other ballgame.  That will need to be painted throughout the house as well.  Luckily, in the remodeled portions of the house, there will be a professional to tackle the painting. (Happy dance!) Below is a picture of my current color choice on a yellow wall in one of the spare bedrooms. I'll have to do two coats, but not that I look at the picture, I think I need to go even lighter in color.
Revere Pewter

Not only are we working on the inside, but having a beautiful corner lot in a neighborhood of wonderful landscapers puts the pressure on us.  My mother has promised to help.  A self-proclaimed gardener of the south, she can grow absolutely ANYTHING! Stephen's parents are not to be overshadowed either.  They have one of the most beautiful lawns and flower beds in their neighborhood as well.  I am confident with their three powers combined (say it like Captain Planet and it makes it more fun) - our yard will soon be the proud recipient of the "Yard of the Month" award.  That's my goal! You can see the current landscape below.  Most of the bushes and plants in the yard are placed too close to the fence and house to really grow. We plan to dig most of these up and either reuse them in other areas or just put them on the curb for pick-up.


Tuesday, June 25, 2013

We'll call this 'progress'

 I jokingly call this post progress because to most it would seem like we have regressed.  To me, a blank canvas is sometimes more exciting than one with art already created on it.  The possibilities are endless for creativity!  I believe this is the same type attitude we should have with our house.  While we LITERALLY have no kitchen, no sunroom, and no bathroom, we are more excited then ever for the changes made to our house.   I know this will only become more and more enjoyable as Ryan uses his talents to create the new inside of our home. 

Few home improvement projects go from start to finish without challenges.  While demo was taking place, the crew found a completely rotted sub floor in the master bathroom. (Thank goodness we were remodeling.  I'd hate to fall through the floor during my shower!) I will say, with older homes, this is typical.  Tiles crack and/or grout chips.  They assured me that they see this all the time with homes this age.  If you are purchasing a home, and it is one story, be sure to ask the inspector to check the flooring under the bathrooms in the house.  This may help you avoid paying for this fix later on.  Below is a picture of our bathroom where the floor USED to be. 

Bathroom without sub floor

Now, we have a larger framed in bathroom that will eventually have a slightly different layout with double sinks! Thank the Lord for double vanities!  Stephen and I have been sharing one bathroom that we can't even stand in together, let alone brush our teeth at the same time.  This will be luxurious.....sighhhhhh.... :) 

New larger bathroom with new sub floor and framed in walls

I'm going to go ahead and attach more pictures from the demo, but not give specifics on location, etc.  I don't want to give too much away before the final reveal. I know seeing the house in person will always be better than in the pictures, but this will have to do until the finished product! 


Tuesday, May 7, 2013

It's Officially Ours!


After months upon months of searching,  Stephen and I finally found the house for us, thanks to Andreana Snyder at 
Prudential C. Dan Joyner.  
Just after signing our closing papers, we headed to our house to take 'before' pictures. 


With a lot of help from Ryan Garrison and his team at Greenwise Design and Construction our house will soon be our dream home. 

The following pictures are all the 'before' pictures from our new home! 


Front entrance (Coat closet/Foyer)
Open room off the kitchen. 

Kitchen

Brick wall with oven, indoor grill, and fireplace

View from the kitchen toward the front door

'Sunroom' off the kitchen. (Porch turned room)

Sunroom side view.  Stephen was too tall to stand at the edge! Notice the roof line....

Master Bathroom (also connected to the main room!)

Shower and toilet in the master
Greenwise Design and Construction will be taking over all these main areas of the house.  We are creating a new entrance, kitchen, 'sunroom' (complete with a roof that will accommodate Stephen's height), and master bathroom.  

Demo pictures from these rooms are next! Stay tuned.